
David Anderson
Originally written in December 1998
Once the chord lengths of a geodesic patch have been determined, models have been created, and structures of various sizes, frequencies, and underlying geometries have been designed and built, the geodesicists mind drifts to other things. Over the summer and in early fall, I slipped into a correspondence mode; I spent time answering questions and instructing others in the Geodesic Arts rather than creating new techniques.
But recently my flames were stoked by a copatriot, and I have turned my attentions back to creative mathematics.
Since the mathematical problem of building a multi-layer geodesic skeleton is now generally solved, developing a covering for the skeleton is a logical next step. The unit of construction for our geodesic frames has been a patch - a single side of a triangularly-tesselated icosahedron, octahedron or tetrahedron. This patch may include an internal or external supporting truss system to resist radially applied forces, but the surfaces we intend to cover all have the similar characteristics. By replicating patches for each triangular surface of the underlying polyhedron (20 for the icosahedron, 8 for the octahedron, or 4 for the tetrahedron) the entire volume can be uniformally covered.
My mind is always on economy, of course: call me cheap, but I want my experiments to be affordable! What we look to do is to construct a covering for a patch with a single sheet of material - a sheet which has been cut to the right shape and size so it can be "stitched" together into a geodesic skin which will exactly fit the underlying framework - with a minimum amount of waste. Every bit of the covering which must be cut away and discarded is money down the tubes, and I'd rather spend my money wisely than to throw it away on unused materials. Mathematically, it is unimportant what material we use, as long as it can be cut from a pattern and folded into the right shape.
Our other goal is not to do this for just a given-frequency geodesic - but for any frequency. The development of the surfaces should be simple; complexity should emerge out of a simple schematic pattern. In order to make a covering from a single sheet, a path made of a number of straight cuts must be made so that it may be folded into shape. The simpler the path, the simpler the pattern, the easier it will be to fabricate, and the quicker satisfaction will come. Satisfaction should never be neglected - it is a very important aspect of life in the geodesic age!
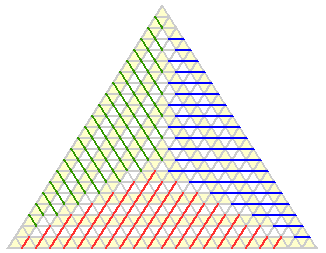
Probably the simplest pattern for the cutting of a path is a spiral:
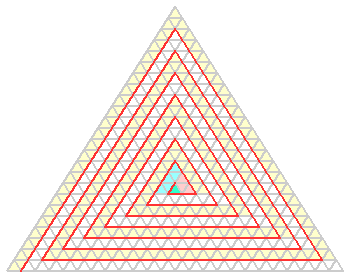
The spiral pattern |
This 24-frequency skin has a single spiral cut in it, indicated by the red line, starting at the bottom left and proceding clockwise to the center. Or, looked at the other way around, we have a cut spiralling outward counter-clockwise from the center. This second perspective is especially useful; embedded in this 24-frequency template are all of the lower frequency templates. The center triangle (the small green one) has no cuts, the 2-frequency triangle (the green triangle plus the three pink ones) also has no cuts, and the three-frequency triangle (formed by adding the five blue ones) has a single cut in it. As sides are added to the center triangle in the clockwise direction, you can see how the spiral lengthens.
Notice this figure represents the path in an unprojected schematic - it is easier to think about the form this way, before the projection of vertices onto the circumscribing sphere has taken place. Our technique will be to determine where the cuts on our n-frequency schematic will be, project it onto the circumscribing sphere, and then flatten it out into a pattern which may be cut from the material of choice. Once projected, each of these triangles will have a different size, and after being mathematically flattened into a pattern and reproduced, geodesic patches will be able to be cut out and folded into shape.

There are a few interesting things to notice about the cutting. Because a flat shape will be projected onto a curved three dimensional surface, the sum of the angles around any vertex will be less than 360 degrees. When the projected face is flattened to become the template for making our covering, the cuts will widen and the area in-between will be waste. A pie-slice will need to be removed at each vertex to get rid of the overlap. Translating this logic back to our template, it says that since each internal vertex in a patch must have a pie-slice extracted, there must be a cut to it. As you can see by inspecting the spiral case, this is true. However, the spiral case wastes a lot of material. Imagine the projection of the spiral schematic and its subsequent flattening onto a sheet for cutting. As the spiral moves away from the center, the gap along the cut edge widens more and more - as the frequency increases, this waste increases dramatically. In fact, the spiral is the worst case scenario: it is the upper bound on waste when cutting from one sheet.
Since the number of internal vertices V in an n-frequency triagular mesh is  there need to be V cuts to reach all the vertices in a single sheet.
Fewer cuts and all vertices could not be reached; more cuts and the sheet would be cut into two or more pieces.
If you care to count in the 24-frequency case above, there are 253 internal vertices, and 253 cuts.
there need to be V cuts to reach all the vertices in a single sheet.
Fewer cuts and all vertices could not be reached; more cuts and the sheet would be cut into two or more pieces.
If you care to count in the 24-frequency case above, there are 253 internal vertices, and 253 cuts.
Using an engineering eye, it seems that in this kind of growth, the corners of each progessively frequencied surface get relatively further from the center. If a line is drawn from the outermost corner to the center triangle without crossing a cut, in the spiral case it must pass through every triangle! In the case of our 24-frequency example, that is 576 triangles - quite a distance.
 To waste less material, it is suggested that if the corners were kept closer to the center (in terms of shortest triangle-distance) then there would be less overall pattern growth and hence less waste.
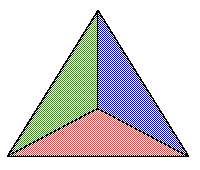
Since there are three corners, then the three straight lines from the corners to the centers indicate the paths which should not be cut.
If cuts were made across these lines, then the corner-to-center non-cut-intersecting path would be longer than the minimum and there would be more waste than necessary.
To waste less material, it is suggested that if the corners were kept closer to the center (in terms of shortest triangle-distance) then there would be less overall pattern growth and hence less waste.
Since there are three corners, then the three straight lines from the corners to the centers indicate the paths which should not be cut.
If cuts were made across these lines, then the corner-to-center non-cut-intersecting path would be longer than the minimum and there would be more waste than necessary.
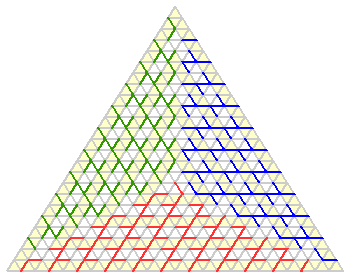
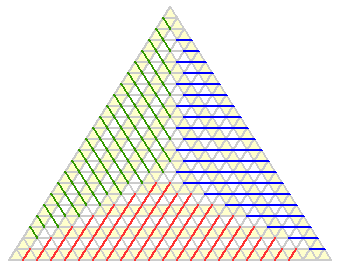
Since these boundaries extend from center to corner, there are three subareas of the triangle to consider: the red, green, and blue areas as shown in the diagram. And of course, since minimizing waste in one subarea means minimizing waste in all three subareas, they should be symmetric. This symmetry implies that the subareas must grow uniformally - if a new row of triangles is added to one, it must also be added to the other two. This symmetry-preserving constraint implies that the frequency of the template must grow in steps of three rather than in steps of one, as in the spiral case. We must therefore partition our frequency-template space into three groups:
Group-1, which is centered around a single triangle,
Group-2, which is centered around a 2-frequency triangle, and
Group-3, which is centered around a 3-frequency triangle.
A nice feature to add to these groups would be the notion of incremental growth; there is no reason not to expect it: at the next frequency interval, the pattern should extend outward in-concert with what has come before. By implementing a recursive, incremental growth scheme, little work will need to be done to arrive at the cutting pattern for the next-higher frequency-increment.
So we'll take a first stab; we'll call this set of recursive patterns Stagger since they seem to stagger left and then right in subsequent increments...
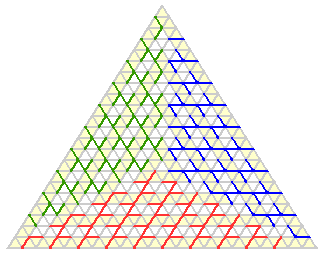
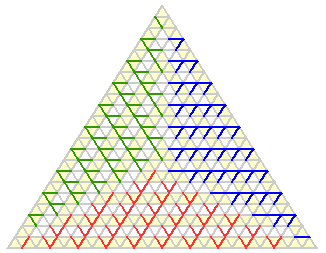
A Group-1 partition |
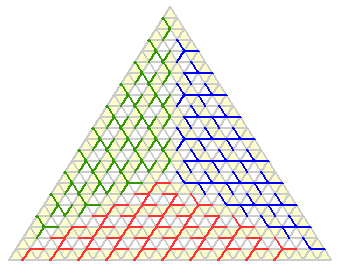
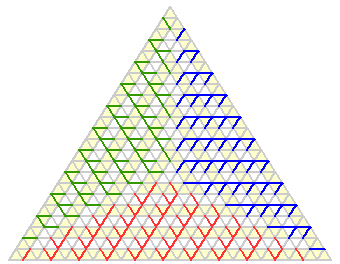
A Group-2 partition |
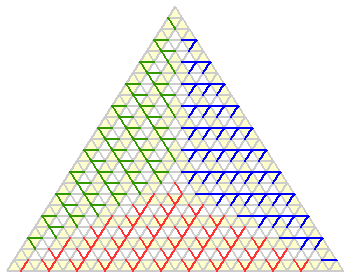
A Group-3 partition |
The cut-colors differentiate the symmetrical sets of the separate subareas: red, green, and blue. The only non-symmetric cut occurs in Group-3, in the center, where only a single internal vertex exists; this one asymmetry does not affect the symmetric growth of any of the subsequent frequency-increments. This cut must be present in all Group-3 variants.
Looking at these and comparing them with the spiral, another interesting notion comes to mind: the shorter a path is, the less it can spread out into wasted space. As we can see in the Stagger partitions, the paths are relatively short, but not optimal. By adjusting the branches a little, we can come up with a shorter set of paths - we'll label them as Shortest since they seem to be at least one of the instances of the schematics with the shortest possible total cut-path length.
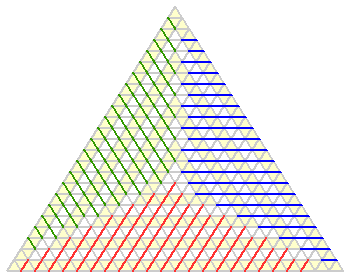
A Group-1 shortest-cuts-path partition |
A Group-2 shortest-cuts-path partition |
A Group-3 shortest-cuts-path partition |
This pattern is optimal for the path length, because each internal vertex is linked to the edge with the minimum number of intervening vertices. But when we take the number of schematic cuts into account (used as a rough measure of the schematic's complexity) we find we are still doing more cutting than we'd like. The fewer cuts we need to make, the easier it should be to fabricate, at least conceptually. By adjusting the branches once more, we come up with an optimal set of recursive groups with a minimum number of cuts - they'll be called Sweetest.
A Group-1 fewest-shortest-cut-path partition |
A Group-2 fewest-shortest-cut-path partition |
A Group-3 fewest-shortest-cut-path partition |
A metric of the average distance of cuts in the different patterns can be developed as the sum of the lengths from an edge divided by the total number of paths. The pattern with the smallest value of this metric should yield the least waste.
| Frequency | Internal Vertices |
Average Distance to Internal Vertex | Number of Straight Cuts | |||||||||
| Spiral | Stagger | Shortest | Sweetest | Spiral | Stagger | Shortest | Sweetest | |||||
| 3 | 1 | 1.0 | 1.00 | 1.00 | 1.00 | 1 | 1 | 1 | 1 | |||
| 4 | 3 | 2.0 | 1.00 | 1.00 | 1.00 | 2 | 3 | 3 | 3 | |||
| 5 | 6 | 3.5 | 1.50 | 1.00 | 1.00 | 3 | 6 | 6 | 6 | |||
| 6 | 10 | 5.5 | 1.40 | 1.10 | 1.10 | 4 | 10 | 10 | 9 | |||
| 7 | 15 | 8.0 | 1.60 | 1.20 | 1.20 | 5 | 12 | 12 | 12 | |||
| 8 | 21 | 11.0 | 1.71 | 1.29 | 1.29 | 6 | 18 | 18 | 15 | |||
| 9 | 28 | 14.5 | 1.82 | 1.39 | 1.39 | 7 | 22 | 22 | 18 | |||
| 10 | 36 | 18.5 | 1.92 | 1.50 | 1.50 | 8 | 27 | 27 | 21 | |||
| 11 | 45 | 23.0 | 2.06 | 1.60 | 1.60 | 9 | 36 | 36 | 24 | |||
| 12 | 55 | 28.0 | 2.14 | 1.71 | 1.71 | 10 | 40 | 40 | 27 | |||
| 13 | 66 | 33.5 | 2.27 | 1.82 | 1.82 | 11 | 45 | 45 | 30 | |||
| 14 | 78 | 39.5 | 2.34 | 1.92 | 1.92 | 12 | 57 | 57 | 33 | |||
| 15 | 91 | 46.0 | 2.49 | 2.03 | 2.03 | 13 | 61 | 61 | 36 | |||
| 16 | 105 | 53.0 | 2.60 | 2.14 | 2.14 | 14 | 69 | 69 | 39 | |||
| 17 | 120 | 60.5 | 2.73 | 2.25 | 2.25 | 15 | 84 | 84 | 42 | |||
| 18 | 136 | 68.5 | 2.82 | 2.36 | 2.36 | 16 | 88 | 88 | 45 | |||
| 19 | 153 | 77.0 | 2.94 | 2.47 | 2.47 | 17 | 96 | 96 | 48 | |||
| 20 | 171 | 86.0 | 3.05 | 2.58 | 2.58 | 18 | 114 | 114 | 51 | |||
| 21 | 190 | 95.5 | 3.16 | 2.69 | 2.69 | 19 | 118 | 118 | 54 | |||
| 22 | 210 | 105.5 | 3.27 | 2.80 | 2.80 | 20 | 129 | 129 | 57 | |||
| 23 | 231 | 116.0 | 3.39 | 2.91 | 2.91 | 21 | 150 | 150 | 60 | |||
| 24 | 253 | 127.0 | 3.51 | 3.02 | 3.02 | 22 | 154 | 154 | 63 | |||
As can be seen from the table, of the symmetric-recursive patterns, the Sweetest groups win on both our average cut length metric and has the simplest schematic straight-cut structure.
Up to this point we've made a lot of assumptions about the results of applying connectivity, group theory, and a bunch of other mathematics. Although I believe all these ideas make sense, they deserve some validation before time is spent projecting and flattening the figures. Part 2 of this series will concern itself with proving some of these geometric ideas; once we have some surity, we will continue onto making the templates in Part 3.